Exbee

This tutorial is to explain how to use zigbee protocol in Xbee module, the most popular programming languages is Python so i decided to develop a light module to send and receive data using Zigbee , i googled  to find a light and a working  modules to operate xbee , but i didn't find it.
I will start by a small tutorial that explain how to use X-CTU, so you have to download it from Digi.com
Required Hardware:
  1. buy two xbee (the same series) , in my case i have xbee pro series 2

  1. USB converter to serial in my case i’m using sparkfun USB to Serial FT232RL.2

  1. Computer (I my case I’m using ubuntu 14.4 as OS) OR Raspberry Pi, i tested this pythom module on the Raspbian and it works as expected. For the other OS I didn’t tested yet so if it’s your case please tested and send me the result.

Required Software:
  1. X-CTU : available from Digi.com
  2. Python :  you have to install Python
  3. Download  EXbee : https://github.com/esmairi/EXbee

Steps:

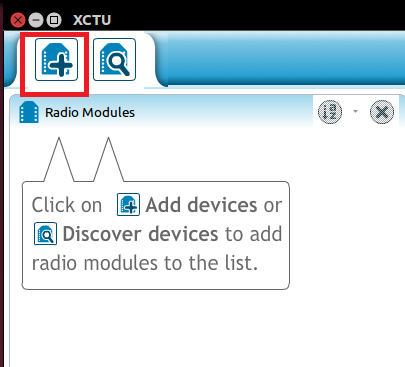
  1. Connect your two xbee to your computer (USB) then open X-CTU and click add and keep the default configuration.


Before starting test modules you have to update the firmware to configure the mode to API, simply click in button below

, in my case i configured the first xbee as Zigbee Coordinator API and the second as Zigbee Router API

Then click Update. The same for the other module

Configuration:
Now we move to the configuration,

  1. Configure  the PANID and channel


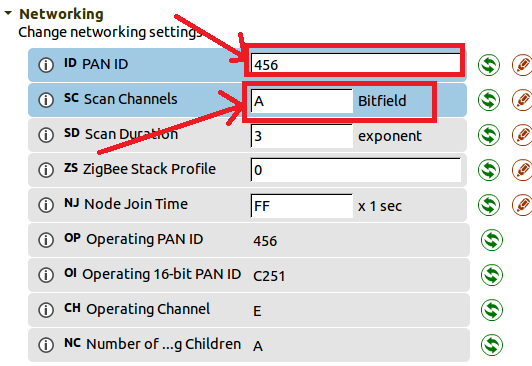
  1. click in the coordinator module ad move the addressing section
To make this module communicate with others routers we have to use Broadcast mode, enter 0 in the DH field and FFFF in the DL field

Note: if you want to send frame to this module you have to use SH and SL as DL and DH

  1. make sure that your module configured to use API 2

To test a communication between those two xbee , you have to construct the frame by click in the generate then choose protocol : Zigbee and set API 2 and frame type to : x10 Transmit   request


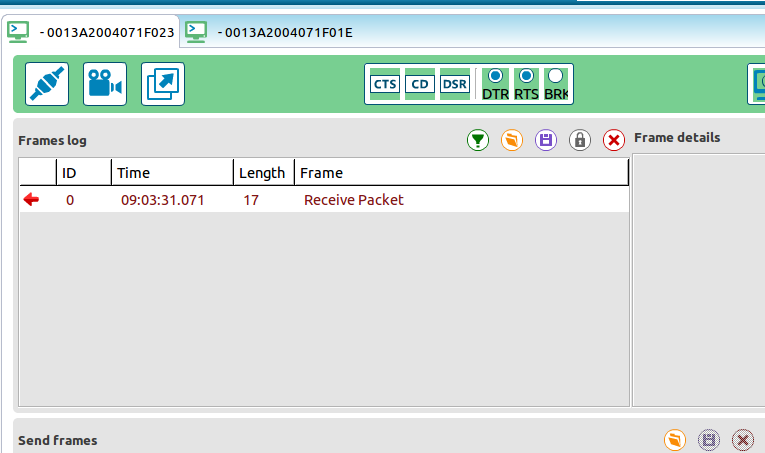
Then click in first top button to open the console (also you have to open the serial of the other module) then click send
You can see the two packets: one transmitted and one received.
When you move to serial of the other module you will see the received packet

Now you succeed to make connection between the two modules.

Move now to develop a program for reading and receiving   .
Download EXbee from github and install it :
https://github.com/esmairi/EXbee
Examples
You can find those examples in the examples dir; I will explain how to use it ☺
Example1:
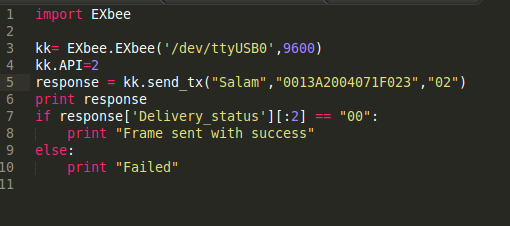
To send a packet, use the function send_tx

Create new python file


Run the program and open the serial for the other module (/dev/ttyUSB1)
As you see the response is a received packet from the module /dev/ttyUSB1, look at the Delivery status: 00 Success

Example2:

To wait for incoming packet, use the function read_rx()
Create new python file


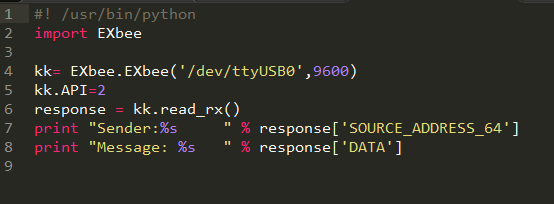
Run the program then go to the console of the module /dev/ttyUSB1 and construct a packet and send it to /dev/ttyUSB0 module and look at the Terminal


You can see that the module receives a packet: the sender is 0013A2004071F023 and Data is salam

Example3:  

To execute an AT command, use the function execute_at(command,param=””) ,


Run the program, you see the result in the terminal

Example4:

Send a Remote AT command:  use the function

send.remote_at(command,address,parameter=””,frame_id=””)


Run the program, the Response is 4071f023

Mysql Replication


To set up a MySQL replication servers, you must have at least two machines, physical or virtual.

The first machine will be called Master while all others will be Slave.

The Master is the main data source. It is on this basis that you will make your INSERT, UPDATE, and DELETE.

The slaves  are content to copy all changes to your master, either in the data or the structure. If you add a new table in the master database, the slaves also added


Setting up replication for two servers:


Turning immediately to the replication configuration. As you will see, this is not very complicated, there is only a logical sequence to follow.

I- Master Server Configuration:                                                                                                  


The first thing to do is to configure the master server so that it writes to a binary log all transactions performed. To do this, open the MySQL configuration file, /etc/mysql/my.cnf.

Scroll through the file until you find the server-id line. Each server in your replication architecture must have a unique id, 1 is the default. You can assign a different value as you see fit..
Under the server-id line, add the following lines:


log_bin = /var/log/mysql/mysql-bin.log               #line1
expire_logs_days = 10                              #line2
max_binlog_size = 1G                              #line3
binlog_do_db = database                         #line4
binlog_do_db = database_2                     #line5
binlog_ignore_db = database_to_ignore       #line6


Line1 :  sets the location on binary log generated by MySQL.
Line2 :  specifies that the log files will be deleted after 10 days .
Line3 : the log file can not exceed 1GB weight. When this limit is reached, MySQL moves to the next file.
Line4-5:  To add a database to replicate, add  binlog_do_db tracking database name.
Line6:  If you want to skip a base, iadd binlog_ignore_db  ttracking database name. 

Now restart your MySQL server to apply the configuration changes.

service mysql restart
if you are using systemd run: 
systemctl restart mysqld
Creation of the replication user :  Connect now to MySQL with root user or any user can create users and with the GRANT permission.
mysql -u root -p
The following command creates and assigns slave_user user rights for replication.


GRANT REPLICATION SLAVE ON *.* TO 'slave_user'@'%' IDENTIFIED BY 'password';
FLUSH PRIVILEGES;


Consider replacing password with a password worthy of the name. We will now show the position in the binary log from which the slave will begin replicating. Before the show, we'll locker tables so there are no writing done in the meantime.
USE database;
FLUSH TABLES WITH READ LOCK;
SHOW MASTER STATUS;
You should get the something similar to the following table:


mysql> SHOW MASTER STATUS;
+------------------+----------+--------------+------------------+
| File             | Position | Binlog_Do_DB | Binlog_Ignore_DB |
+------------------+----------+--------------+------------------+
| mysql-bin.000001 |      1201 | database     |                  |
+------------------+----------+--------------+------------------+
1 row in set (0.000000000000001 sec)


mysql-bin.000001 : file name.

1207 : the current position.

Now open a new terminal and connect to your Master server. This is necessary because any change in the first tab will result to unlock the tables.

The following command is used to perform a dump of the database. The file we will recover contains all SQL statements needed to recreate the database in the slave .


mysqldump -u root -p --opt database > database.sql


Now go back to your first terminal and unlock the tables.

UNLOCK TABLES;

We have now completed the configuration of the master database.


I- Slave Server Configuration:                                                                                                  


Connect to the slave server and open the MySQL shell. We will create the database that you want to replicate.


CREATE DATABASE database;

Now , import database.sql  (the easiest way is to transfer the master server to the slave server via scp)


mysql -u root -p database < database.sql


You now have a working copy of your database based master slave. However, this copy will remain intact and will not be updated with changes made to the master yet.

We will modify the file /etc/mysql/my.cnf slave server to make the necessary changes.


As earlier, find the server-id line and assign an id to the server (this must be different from that of the master server).


server-id = 10


relay-log = /var/log/mysql/mysql-relay-bin.log
log_bin = /var/log/mysql/mysql-bin.log
replicate-do-db = database
replicate-ignore-db = database_to_ignore


You can now restart your MySQL slave server.


service mysql restart

Now that our server is properly configured, we can tell MySQL and begin replicating. For this, we must provide some details about the server and password to connect to it.


CHANGE MASTER TO MASTER_HOST='192.168.75.10', MASTER_USER='slave_user', MASTER_PASSWORD='password', MASTER_LOG_FILE='mysql-bin.000001', MASTER_LOG_POS=1201;


This command performs several actions. First, it tells our server will connect to the master server(IP : 192.168.75.10).

Second, it indicates the identifiers to connect to it (slave_user user and password password).

Finally, it tells the slave from where to start and how to use its replication file (replace the values that you got on the master while ago).

Now you can start replication.


START SLAVE;


To verify that everything is working, type the following command to display a summary of the configuration.


mysql> SHOW SLAVE STATUS\G
*************************** 1. row ***************************
Slave_IO_State: Waiting for master to send event
Master_Host: 1.2.3.4
Master_User: slave_user
Master_Port: 3306
Connect_Retry: 60
Master_Log_File: mysql-bin.000001
Read_Master_Log_Pos: 1201
Relay_Log_File: mysql-relay-bin.000001
Relay_Log_Pos: 968023
Relay_Master_Log_File: mysql-bin.000001
Slave_IO_Running: Yes
Slave_SQL_Running: Yes
Replicate_Do_DB: database
Replicate_Ignore_DB: database_to_ignore
Replicate_Do_Table:
Replicate_Ignore_Table:
Replicate_Wild_Do_Table:
Replicate_Wild_Ignore_Table:
Last_Errno: 0
Last_Error:
Skip_Counter: 0
Exec_Master_Log_Pos: 1201
Relay_Log_Space: 5622
Until_Condition: None
Until_Log_File:
Until_Log_Pos: 0
Master_SSL_Allowed: No
Master_SSL_CA_File:
Master_SSL_CA_Path:
Master_SSL_Cert:
Master_SSL_Cipher:
Master_SSL_Key:
Seconds_Behind_Master: 0
Master_SSL_Verify_Server_Cert: No
Last_IO_Errno: 0
Last_IO_Error:
Last_SQL_Errno: 0
Last_SQL_Error:
Replicate_Ignore_Server_Ids:
Master_Server_Id: 1
1 row in set (0.0000000001 sec)


If a problem occurs, you will find the error in the line Last_Error


Spring + Tiles + Datastore(Google Appengine)

The following example show how to write a simple web based application using Spring Web MVC framework +Tiles, we will use Google Appengine . We start with introducing the MVC Pattern. Finally, we will develop a full example. 
So let's start:

MVC Pattern:                                                                                                   


MVC pattern breaks an application into three parts:
Model:                 The domain object model / service layer
View:                   Template code / markup
Controller:       Presentation logic / action classes:

Spring Controller(Front Controller):
  • Maps request URLs to controller classes. Implemented as a servlet.
  • Loads the Model & returns a ModelandView Interacts with backend services of the system.


The front controller is the component that handles the incoming requests. First, it delegates the request to a suitable controller. When that controller has finished processing and updating the model, the front controller will determine which view to render based on the outcome. In most cases, this front controller is implemented as a javax.servlet.Servlet servlet. In Spring MVC, this front controller is org.springframework.web.servlet.DispatcherServlet. MVC defines interaction between components to promote separation of concerns and loose coupling
  • Each file has one responsibility
  • Enables division of labour between programmers and designers
  • Facilitates unit testing
  • Easier to understand, change and debug


Example: Books Manager                                                                                    


      This is a step-by-step account of how to develop a MVC web application from scratch using the Spring Framework. To make it easier i divided this example into four parts:

1-DAO

2-Services

3-Controller

4-Views


So what we'll do is to create a J2EE web application built for deployment in App Engine backed by a simple DAO to abstract the Google BigTable databases. We start with creating New Web Application Project

1- DAO(Data Access Object):


     The data access layer is responsible for interfacing with the underlying persistence mechanism. This layer knows how to store and retrieve objects from the datastore. It does this in such a way that the service layer doesn’t know which underlying datastore is used. (The datastore could be a database, but it could also consist of flat files on the file system.) In this example we define the bean "Book", the interface "BookDao" and "BookDatastore".


We start with creating new package "com.dao".then create new class "Book" ,in this class we define the properties of a Book: id, title, description, Content, author, ISBN, Price and the date of creation.


Book.java
package com.dao;
import java.util.Date;
import com.google.appengine.api.datastore.Text;
public class Book 
{
private Long id;
private String title;
private String description;
private Text text;
private double price;
private String isbn;
private String author;
private Date date;
public Book() {
    
super();

}
public Book( String title, String description, Text text,
        
double price, String isbn,String author) {
    
super();
    
this.title = title;
    
this.description = description;
    
this.text = text;
    
this.price = price;
    
this.isbn = isbn;
    
this.author=author;
}
public Long getId() {
    
return id;
}
public void setId(Long id) {
    
this.id = id;
}
public String getTitle() {
    
return title;
}
public void setTitle(String title) {
    
this.title = title;
}
public String getDescription() {
    
return description;
}
public void setDescription(String description) {
    
this.description = description;
}
public String getText() {
    
return text.getValue();
}
public void setText(Text text) {
    
this.text = text;
}
public double getPrice() {
    
return price;
}
public void setPrice(double price) {
    
this.price = price;
}
public String getIsbn() {
    
return isbn;
}
public void setIsbn(String isbn) {
    
this.isbn = isbn;
}
public String getAuthor() {
    
return author;
}
public void setAuthor(String author) {
    
this.author = author;
}
public Date getDate() {
    
return date;
}
public void setDate(Date date) {
    
this.date = date;
}


}


Create new interface "BookDao":

BookDao.java
package com.dao;
import java.util.List;
public interface BookDao {
public void addBook(Book book);
public void deleteBook(Long id);
public Book getBook(Long id);
public List<Book> getListBooks();
public void updateBook(Long id,Book book);
public void getBooks();
public List<Book> getRecentBooks();

}


Create new class "BookDatastore ": used to access to datastore :adding, updating and deleting "books" entity:


BookDatastore.java
package com.dao;
import java.util.ArrayList;
import java.util.Date;
import java.util.Iterator;
import java.util.List;
import com.google.appengine.api.datastore.DatastoreService;
import com.google.appengine.api.datastore.DatastoreServiceFactory;
import com.google.appengine.api.datastore.Entity;
import com.google.appengine.api.datastore.EntityNotFoundException;
import com.google.appengine.api.datastore.FetchOptions;
import com.google.appengine.api.datastore.Key;
import com.google.appengine.api.datastore.KeyFactory;
import com.google.appengine.api.datastore.PreparedQuery;
import com.google.appengine.api.datastore.Query;
import com.google.appengine.api.datastore.Query.SortDirection;
import com.google.appengine.api.datastore.QueryResultList;
import com.google.appengine.api.datastore.Text;
public class BookDatastore implements BookDao {
      
private List<Book> listBooks=new ArrayList<Book>();

      @Override
        
public void getBooks() {
            DatastoreService datastore = DatastoreServiceFactory.getDatastoreService();
            Query query = 
new Query("Books");
            PreparedQuery pq=datastore.prepare(query);
            QueryResultList<Entity> bs = pq.asQueryResultList(FetchOptions.Builder.withDefaults());

            Iterator<Entity> it=bs.iterator();
          
while(it.hasNext()){
              Book book;
              Entity entity=(Entity) it.next();
              book=
this.getBook(entity.getKey().getId());
              
this.getListBooks().add(book);
          }

        }

        @Override
        
public List<Book> getRecentBooks() {
             DatastoreService datastore = DatastoreServiceFactory.getDatastoreService();
                Query query = 
new Query("Books").addSort("Date", SortDirection.DESCENDING);
                PreparedQuery pq=datastore.prepare(query);
                QueryResultList<Entity> bs = pq.asQueryResultList(FetchOptions.Builder.withLimit(4));
                Iterator<Entity> it=bs.iterator();
                List<Book> r=
new ArrayList<Book>();
              
while(it.hasNext()){
                  Book book;
                  Entity entity=(Entity) it.next();
                  book=
this.getBook(entity.getKey().getId());
                  r.add(book);
              }
            
return r;
        }

    @Override
    
public void addBook(Book book) {
        DatastoreService datastore = DatastoreServiceFactory.getDatastoreService();
        Entity entityBook=
new Entity("Books");
        entityBook.setProperty(
"Title", book.getTitle());
        entityBook.setProperty(
"Description", book.getDescription());
        entityBook.setProperty(
"Author", book.getAuthor());
        entityBook.setProperty(
"Price(US Dollar)", book.getPrice());
        entityBook.setProperty(
"Isbn", book.getIsbn());
        entityBook.setProperty(
"Content"new Text(book.getText()));
        entityBook.setProperty(
"Date"new Date());
        datastore.put(entityBook);
    }

    @Override
    
public void deleteBook(Long id) {
        DatastoreService datastore = DatastoreServiceFactory.getDatastoreService();
        Key k=KeyFactory.createKey(
"Books", id);
        datastore.delete(k);

    }

    @Override
    
public Book getBook(Long id) {
        DatastoreService datastore = DatastoreServiceFactory.getDatastoreService();
        Key k=KeyFactory.createKey(
"Books", id);
        Book b;
        
try {
            Entity eb=datastore.get(k);
             String title=eb.getProperty(
"Title").toString();
             String description=eb.getProperty(
"Description").toString();
             Text text;
             
double price=Double.parseDouble(eb.getProperty("Price(US Dollar)").toString());
             String isbn=eb.getProperty(
"Isbn").toString();
             String author=eb.getProperty(
"Author").toString();
             Date date=(Date) eb.getProperty(
"Date");
             
try {
                text=(Text) eb.getProperty(
"Content");
            } 
catch (Exception e) {
                text=
new Text(eb.getProperty("Content").toString());
            }
             b=
new Book(title, description, text, price, isbn, author);
             b.setId(id);
             b.setDate(date);
             
return b;
 
        } 
catch (EntityNotFoundException e) {
            
return null;
        }
    }

    @Override
    
public void updateBook(Long id, Book book) {
        DatastoreService datastore = DatastoreServiceFactory.getDatastoreService();
        Key k=KeyFactory.createKey(
"Books", id);
        
try {
            Entity eb=datastore.get(k);
            eb.setProperty(
"Title", book.getTitle());
            eb.setProperty(
"Description", book.getDescription());
            eb.setProperty(
"Author",book.getAuthor());
            eb.setProperty(
"Isbn", book.getIsbn());
            eb.setProperty(
"Price(US Dollar)", book.getPrice());
            eb.setProperty(
"Content"new Text(book.getText()));
            eb.setProperty(
"Date"new Date());
            datastore.put(eb);


        } 
catch (EntityNotFoundException e) {
            e.printStackTrace();
        }


    }

    
public List<Book> getListBooks() {
        
return listBooks;
    }

    
public void setListBooks(List<Book> listBooks) {
        
this.listBooks = listBooks;
    }

}


2- Services:

The service layer is a very important layer in the architecture of an application. It can be considered the heart of our application because it exposes the functionality (the use cases) of the system to the user. In this example we define an interfae "BookServiceInterface" and the implementation "BookService" . 


We start with creating new package "service".
Create new interface "BookServicesInterfaece"

BookServicesInterface.java
package com.services;
import java.util.List;
import com.dao.Book;
public interface BookServiceInterface {
    
public void CreateBook(Book book);
    
public void deleteBook(Long id);
    
public Book SearchBook(Long id);
    
public List<Book> getListBooks();
    
public void updateBook(Long id,Book book);
    
public List<Book> getRecentBooks();
}


Create new class "BookService"


BookService.java
package com.services;
import java.util.List;
import com.dao.Book;
import com.dao.BookDatastore;
public class BookService implements BookServiceInterface{

     BookDatastore bd=
new BookDatastore();

    
public BookDatastore getBd() {
    
return bd;
}

    
public void setBd(BookDatastore datastore) {
    
this.bd = datastore;
}

    @Override
    
public void CreateBook(Book book) {
        bd.addBook(book);

    }

    @Override
    
public void deleteBook(Long id) {
        bd.deleteBook(id);

    }

    @Override
    
public Book SearchBook(Long id) {
        
return bd.getBook(id);
    }

    @Override
    
public List<Book> getListBooks() {
        bd.getBooks();
        
return bd.getListBooks();
    }

    @Override
    
public void updateBook(Long id, Book book) {
        bd.updateBook(id, book);

    }

    @Override
    
public List<Book> getRecentBooks() {
        
return bd.getRecentBooks();

    }

}


3- Controller:

Controllers play a crucial role in a web application: they execute the actual request, prepare the model, and select a view to render. In conjunction with the dispatcher servlet, controllers also play a crucial role in the request processing workflow. The controller is the glue between the core application and the web interface to the application. In this chapter, we will take a look at the two different controller approaches and cover the out-of-the-box implementations provided with the Spring Framework. In this example we want to generate a links to the views using a given data from the Service Layer

We start with creating new package "com.controller" Create new class "BookController"


BookController.java
package com.controller;
import java.util.List;
import org.springframework.beans.factory.annotation.Autowired;
import org.springframework.stereotype.Controller;
import org.springframework.ui.Model;
import org.springframework.web.bind.annotation.RequestMapping;
import org.springframework.web.bind.annotation.RequestMethod;
import org.springframework.web.bind.annotation.RequestParam;
import org.springframework.web.servlet.ModelAndView;
import com.dao.Book;
import com.google.appengine.api.datastore.Text;
import com.services.BookService;

@Controller
public class BookController {
    @Autowired
    BookService services;

    @RequestMapping(
"")
    
public ModelAndView index(Model model){
        services=
new BookService();
        model.addAttribute(
"books", services.getListBooks());
        model.addAttribute(
"recent",RecentBooks());
        
return new ModelAndView("list");
    }
    @RequestMapping(
"/add")
    
public ModelAndView add(Model model){
        model.addAttribute(
"New","disabled ");
        model.addAttribute(
"Edit","disabled ");
        model.addAttribute(
"Delete","disabled ");
        model.addAttribute(
"recent",RecentBooks());

        
return new ModelAndView("add");
    }
    
public  List<Book> RecentBooks(){
        BookService recent=
new BookService();
        
return recent.getRecentBooks();

    }
    @RequestMapping(value=(
"/add-book"),method=RequestMethod.POST)
    
public ModelAndView Add(@RequestParam String title,
                            @RequestParam String description,
                            @RequestParam String isbn,
                            @RequestParam Text content,
                            @RequestParam String price,
                            @RequestParam String author,
                            Model model){

        Book book=
new Book(title, description, content,Double.parseDouble( price), isbn, author);
        services.CreateBook(book);
        
return new ModelAndView("redirect:list");
    }

    @RequestMapping(value=(
"/edit-book"))
    
public ModelAndView Edit(@RequestParam Long id,
                             Model model){
        model.addAttribute(
"book", services.SearchBook(id));
        model.addAttribute(
"New","disabled ");
        model.addAttribute(
"Edit","disabled ");
        model.addAttribute(
"Delete","disabled ");
        model.addAttribute(
"recent",RecentBooks());
        
return new ModelAndView("edit");
    }

    @RequestMapping(value=(
"/update"),method=RequestMethod.POST)
    
public ModelAndView Update( @RequestParam String title,
                                @RequestParam String description,
                                @RequestParam String isbn,
                                @RequestParam Text content,
                                @RequestParam String price,
                                @RequestParam String author,
                                @RequestParam String id,
                                Model model){

        Book book=
new Book(title, description, content,Double.parseDouble( price), isbn, author);
        services.updateBook(Long.parseLong(id), book);
        
return new ModelAndView("redirect:list");
    }

    @RequestMapping(
"/list")
    
public ModelAndView list(Model model){
        services=
new BookService();
        model.addAttribute(
"books", services.getListBooks());
        model.addAttribute(
"recent",RecentBooks());
        
return new ModelAndView("list");
    }
    @RequestMapping(
"/delete")
    
public ModelAndView delete(@RequestParam String ids){
       String[] id=ids.split(
",");
       
for(String i:id){
           
if(!i.isEmpty())
               services.deleteBook(Long.parseLong(i));
       }
        
return new ModelAndView("redirect:list");
    }

}


4- Views:


The view is the actual implementation, and it uses the model to render itself in a web application. This could be a JSP or JSF page, but it could also be a PDF or XML representation of a page. In this example we will use Bootstrap and Tiles. Apache Tiles2 is a powerful page composition framework that allows you to compose your page of different page components (the tiles). These page components can be reused and configured in different page layouts. Originally it was designed as a JSP composition framework; To get started with Tiles we must configure it. Next we also need to configure the view resolver to be able to return Tiles-based views, and finally we need to specify our page composition and add the different templates (tiles). We start with configuring Tiles so let's create new xml file config.xml into WEB-INF/config, this file contains the page definitions:

 Book.xml      
<?xml version="1.0" encoding="UTF-8" ?>

<!DOCTYPE tiles-definitions PUBLIC

       "-//Apache Software Foundation//DTD Tiles Configuration 2.0//EN"

       "http://tiles.apache.org/dtds/tiles-config_2_0.dtd">

<tiles-definitions>

       <definition name="book" template="/WEB-INF/views/layouts/Layout.jsp">

             <put-attribute name="header" value="/WEB-INF/views/layouts/Header.jsp" />

             <put-attribute name="menu" value="/WEB-INF/views/layouts/Menu.jsp" />

             <put-attribute name="sidebar" value="/WEB-INF/views/layouts/Side.jsp" />

             <put-attribute name="body" value="" />
             <put-attribute name="footer" value="/WEB-INF/views/layouts/Footer.jsp" />
       </definition>

       <definition name="add" extends="book">
             <put-attribute name="body" value="/WEB-INF/views/add.jsp" />
       </definition>
       <definition name="list" extends="book">
             <put-attribute name="body" value="/WEB-INF/views/list.jsp" />
       </definition>
       <definition name="edit" extends="book">
             <put-attribute name="body" value="/WEB-INF/views/edit.jsp" />
       </definition>
</tiles-definitions>


We have created three definitions: the definition with the name book is the general layout configuration, the other definitions extend this general layout

So now we will create the Layout:


Layout.jsp

<%@ taglib prefix="c" uri="http://java.sun.com/jsp/jstl/core"%>
<%@ taglib uri="http://tiles.apache.org/tags-tiles" prefix="tiles"%>
<%@ page language="java" contentType="text/html; charset=ISO-8859-1"
    pageEncoding="ISO-8859-1"%>
<!DOCTYPE html PUBLIC "-//W3C//DTD HTML 4.01 Transitional//EN" "http://www.w3.org/TR/html4/loose.dtd">
<html>
<head>
<meta charset="utf-8">
<meta name="viewport" content="width=device-width, initial-scale=1.0">
<meta http-equiv="Content-Type" content="text/html; charset=ISO-8859-1">
<!--[if lt IE 9]>
    <script src="/media/jui/js/html5.js"></script>
    <![endif]
-->
<title>Books Manager</title>
<link href="${pageContext.request.contextPath}/css/bootstrap.min.css"
    rel="stylesheet" />
<link
    href="${pageContext.request.contextPath}/css/bootstrap-theme.min.css"
    rel="stylesheet" />
<link href="${pageContext.request.contextPath}/css/book.css"
    rel="stylesheet" />
<script src="${pageContext.request.contextPath}/js/jquery.js"
    type="text/javascript"></script>
<script src="${pageContext.request.contextPath}/js/bootstrap.min.js"
    type="text/javascript"></script>
<script src="${pageContext.request.contextPath}/js/book.js"
    type="text/javascript"></script>
</head>
<body>
    <tiles:insertAttribute name="header" />
    <tiles:insertAttribute name="menu" />
    <div class="container">
        <tiles:insertAttribute name="sidebar" />
        <div class="col-md-9 content">
            <tiles:insertAttribute name="body" />

        </div>
    </div>
    <tiles:insertAttribute name="footer" />
</body>
</html>


Let's create the header:


Header.jsp
<header class="page-header">
        <div class="container">
            <div class="row">
                <div class="col-md-2 container-logo"></div>
                <div class="col-md-10">
                    <h4 class="title-header">
                      <span class="glyphicon glyphicon-file"></span>
                        Books Manager

                    </h4>
                </div>
            </div>
        </div>
    </header>


Create he menu
Menu.jsp
<%@ taglib prefix="c" uri="http://java.sun.com/jsp/jstl/core"%>

    <div class="options">
        <div class="btn-toolbar" role="toolbar">
            <a href="${pageContext.request.contextPath}/add" ${New} class="btn btn-sm btn-success"><span class="glyphicon glyphicon-plus"> </span> New</a>
            <a type="button" class="btn btn-sm btn-default edit" ${Edit} onclick="editbook()"><span class="glyphicon glyphicon-text-width"> </span> Edit</a>
            <a type="button" class="btn btn-sm btn-default delete" ${Delete} onclick="delbooks()"><span class="glyphicon glyphicon-trash"> </span> Delete</a>
            <a href="${pageContext.request.contextPath}/list"  type="button" class="btn btn-sm btn-default"><span class="glyphicon glyphicon-list"> </span> list Books</a>
        </div>
    </div>
    <script type="text/javascript">
    
//select all books    jQuery(document).ready(function() {
    
$("#selectall").click(function(event) {
        
if(this.checked) {
            
$(".book").each(function() {
                
this.checked = true;     
            });
        }
else{
            
$(".book").each(function() {
                
this.checked = false;        
            });
        }
    });
    });

    
//get selected books    function editbook(){
        
var n=$(".book:checked").length;
        
if(n==1){
            
id=$(".book:checked").attr("value");

        
var link="${pageContext.request.contextPath}/edit-book?id="+id;
        
$(".edit").attr("href",link);
        }
        
else alert("choose a book");
    }

    
//delete books
    
function delbooks(){
        
var n=$(".book:checked").length;
        
if(n>0){
        
var ids="";
        
$(".book:checked").each(function(){
            
ids=$(this).attr("value")+","+ids;

        });
        
var link="${pageContext.request.contextPath}/delete?ids="+ids;
        
$(".delete").attr("href",link);
        }
        
else alert("choose a book to delete");
    }

    
</script>


Create the Sidebar:

Side.jsp
<%@ taglib prefix="c" uri="http://java.sun.com/jsp/jstl/core"%>

<div class="col-md-3 sidenav">
 <h3><span class="glyphicon glyphicon-book"></span> Recent Books</h3>
            <ul class="nav">
            <c:forEach items="${recent }" var="rb">
                <li >
                    <a href="${pageContext.request.contextPath}/edit-book?id=${rb.id}" ><span class="glyphicon glyphicon-saved"></span> ${rb.title }</a>
                </li>
            </c:forEach>
            </ul>
     <a href="${pageContext.request.contextPath}/list" style="margin-left:12%><span class="glyphicon glyphicon-arrow-right"></span>  All books</a>
        </div>


Create the Footer

Footer.jsp
<center>
    <p>Copyright <span class="glyphicon glyphicon-copyright-mark"></span> JEsmairi</p>
</center>


Now let's link the views to the Controller:


Create new jsp file "list"


list.jsp

<%@ taglib prefix="c" uri="http://java.sun.com/jsp/jstl/core"%>
<div class="table-responsive">
      <table class="table table-bordered table-striped">
        <thead>
          <tr>
            <th><input type="checkbox" id="selectall"/></th>
            <th>Title</th>
            <th>Description</th>
            <th>Author</th>
            <th>Price</th>
            <th>Date</th>
            <th>Content</th>
          </tr>
        </thead>
        <c:forEach items="${books}" var="book">
         <tr>
            <td ><input type="checkbox" class="book" value="${book.id}"/></td>
            <td >${book.title}</td>
            <td width="22%" >${book.description}</td>
            <td >${book.author}</td>
            <td >${book.price}$</td>
            <td width="21%">${book.date}</td>
            <td >${book.text}</td>
          </tr>
        </c:forEach>
        <tbody>

        </tbody>
      </table>
</div>

Create new jsp file "add"

add.jsp
<%@ page language="java" contentType="text/html; charset=windows-1256"
    pageEncoding="windows-1256"%>
<form class="form-horizontal" role="form" action="${pageContext.request.contextPath}/add-book" method="post">
  <div class="form-group">
    <label for="title" class="col-sm-2 control-label">Title</label>
    <div class="col-sm-10">
      <input type="text" class="form-control" name="title" id="title" placeholder="title">
    </div>
  </div>
  <div class="form-group">
    <label for="Author" class="col-sm-2 control-label">Author</label>
    <div class="col-sm-10">
      <input type="text" class="form-control" name="author" id="Author" placeholder="author">
    </div>
  </div>
  <div class="form-group">
    <label for="Description" class="col-sm-2 control-label">Description</label>
    <div class="col-sm-10">
      <input type="text" class="form-control" name="description" id="Description" placeholder="Description">
    </div>
  </div>
   <div class="form-group">
    <label for="isbn" class="col-sm-2 control-label">Isbn</label>
    <div class="col-sm-10">
      <input type="text" class="form-control" name="isbn" id="isbn" placeholder="isbn">
    </div>
  </div>
    <div class="form-group">
    <label for="price" required class="col-sm-2 control-label">Price($)</label>
    <div class="col-sm-10">
      <input type="text" class="form-control" name="price" id="price" placeholder="price">
    </div>
  </div>
   <div class="form-group">
    <label for="Content" class="col-sm-2 control-label">Content</label>
    <div class="col-sm-10">
     <textarea class="textarea" id="Content" name="content" placeholder="insert Text"
        style="width100%height200pxfont-size14pxline-height18px;"></textarea>
    </div>
  </div>
  <div class="form-group">
    <div class="col-sm-offset-7 col-sm-5">
    <a type="button" href="${pageContext.request.contextPath}/list" class="btn btn-sm btn-default" >Cancel</a>
      <button type="submit" class="btn btn-success">Add book</button>
    </div>
  </div>
</form>


Create new jsp file "edit"

edit.jsp
<%@ taglib prefix="c" uri="http://java.sun.com/jsp/jstl/core"%>

<form class="form-horizontal" role="form" action="${pageContext.request.contextPath}/update" method="post">
  <div class="form-group">
    <label for="title" class="col-sm-2 control-label">Title</label>
    <div class="col-sm-10">
      <input type="text" class="form-control" name="title" id="title"  value="${book.title}">
    </div>
  </div>
  <div class="form-group">
    <label for="Author" class="col-sm-2 control-label">Author</label>
    <div class="col-sm-10">
      <input type="text" class="form-control" name="author" id="Author"  value="${book.author}">
    </div>
  </div>
  <div class="form-group">
    <label for="Description" class="col-sm-2 control-label">Description</label>
    <div class="col-sm-10">
      <input type="text" class="form-control" name="description" id="Description" value="${book.description}">
    </div>
  </div>
   <div class="form-group">
    <label for="isbn" class="col-sm-2 control-label">Isbn</label>
    <div class="col-sm-10">
      <input type="text" class="form-control" name="isbn" id="isbn" value="${book.isbn}">
    </div>
  </div>
    <div class="form-group">
    <label for="price" required class="col-sm-2 control-label">Price($)</label>
    <div class="col-sm-10">
      <input type="text" class="form-control" name="price" id=="price" value="${book.price}">
    </div>
  </div>
   <div class="form-group">
    <label for="Content" class="col-sm-2 control-label">Content</label>
    <div class="col-sm-10">
     <textarea class="textarea" id="Content" name="content" placeholder="insert Text"
        style="width100%height200pxfont-size14pxline-height18px;">${book.text}</textarea>
    </div>
  </div>
  <div class="form-group">
    <div class="col-sm-offset-7 col-sm-5">
    <a type="button" href="${pageContext.request.contextPath}/list" class="btn btn-sm btn-default" >Cancel</a>
      <button type="submit" class="btn btn-success">Update book</button>
        <input class="hidden" type="text" name="id" value="${book.id }">

    </div>
  </div>
</form>


Add bootstrap (css,fonts,js) and jquery into new folder resources


Now let's configure the Application
Appengine-web.xml
<?xml version="1.0" encoding="utf-8"?>
<appengine-web-app xmlns="http://appengine.google.com/ns/1.0">         
  <application></application>
  <version>1</version>

  <threadsafe>true</threadsafe>

  <system-properties>
    <property name="java.util.logging.config.file" value="WEB-INF/logging.properties"/>
  </system-properties>


</appengine-web-app>

web.xml
<?xml version="1.0" encoding="utf-8"?>
<web-app xmlns:xsi="http://www.w3.org/2001/XMLSchema-instance"
xmlns="http://java.sun.com/xml/ns/javaee"
xmlns:web="http://java.sun.com/xml/ns/javaee/web-app_2_5.xsd"
xsi:schemaLocation="http://java.sun.com/xml/ns/javaee
http://java.sun.com/xml/ns/javaee/web-app_2_5.xsd" version="2.5">
       <listener>
             <listener-class>org.springframework.web.context.ContextLoaderListener</listener-class>
       </listener>
      
    <context-param>
             <param-name>contextConfigLocation</param-name>
             <param-value>/WEB-INF/config/spring-beans.xml</param-value>
       </context-param>
      
       <servlet>
             <servlet-name>dispatcher</servlet-name>
             <servlet-class>org.springframework.web.servlet.DispatcherServlet</servlet-class>
             <init-param>
                    <param-name>contextConfigLocation</param-name>
                    <param-value>/WEB-INF/config/application-servlet-config.xml</param-value>
             </init-param>
       </servlet>
      
      
       <servlet-mapping>
             <servlet-name>dispatcher</servlet-name>
             <url-pattern>/</url-pattern>
       </servlet-mapping>
      
</web-app>
Spring Configuration:
Application-servlet-config.xml
<?xml version="1.0" encoding="UTF-8"?>
<beans xmlns="http://www.springframework.org/schema/beans"
       xmlns:xsi="http://www.w3.org/2001/XMLSchema-instance" xmlns:p="http://www.springframework.org/schema/p"
       xmlns:context="http://www.springframework.org/schema/context"
       xmlns:mvc="http://www.springframework.org/schema/mvc"
       xsi:schemaLocation="http://www.springframework.org/schema/mvc http://www.springframework.org/schema/mvc/spring-mvc-3.1.xsd
             http://www.springframework.org/schema/beans http://www.springframework.org/schema/beans/spring-beans-3.0.xsd
             http://www.springframework.org/schema/context http://www.springframework.org/schema/context/spring-context-3.0.xsd">

  <mvc:annotation-driven />
       <mvc:resources mapping="/css/**" location="/WEB-INF/resources/css/"
             cache-period="0" />
       <mvc:resources mapping="/js/**" location="/WEB-INF/resources/js/"
             cache-period="0" />
       <mvc:resources mapping="/fonts/**" location="/WEB-INF/resources/fonts/"
             cache-period="0" />
       <context:component-scan base-package="com.controller"/>
      
       <bean id="viewResolver"
              class="org.springframework.web.servlet.view.UrlBasedViewResolver">
             <property name="viewClass">
                    <value>
                           org.springframework.web.servlet.view.tiles2.TilesView
                    </value>
             </property>
       </bean>
       <bean id="tilesConfigurer"
              class="org.springframework.web.servlet.view.tiles2.TilesConfigurer">
             <property name="definitions">
                    <list>
                           <value>/WEB-INF/config/book.xml</value>
                    </list>
             </property>
       </bean>
      
</beans>


spring-beans.xml
<?xml version="1.0" encoding="UTF-8"?>
<beans xmlns="http://www.springframework.org/schema/beans"
    xmlns:xsi="http://www.w3.org/2001/XMLSchema-instance"
    xmlns:tx="http://www.springframework.org/schema/tx"
    xmlns:context="http://www.springframework.org/schema/context"
    xsi:schemaLocation="http://www.springframework.org/schema/beans
              http://www.springframework.org/schema/beans/spring-beans-2.5.xsd
              http://www.springframework.org/schema/tx
              http://www.springframework.org/schema/tx/spring-tx-2.5.xsd
              http://www.springframework.org/schema/context
              http://www.springframework.org/schema/context/spring-context-2.5.xsd">

<bean class="com.dao.BookDatastore" id="bookdata" ></bean>

<bean class="com.services.BookService" id="serviceBook">
       <property name="bd" ref="bookdata"  ></property>
</bean>

 </beans>

Download source: 


Test

Run the application:
Got to localhost:8888

Click on New
To edit a book chose a book and click edit


Older Posts
Copyright © JEsmairi
Back To Top